
Hi all, my K98 conversion is underway at the mo, was wondering if anyone had a spare/scrap dboys rear bolt assembly and handle? the boneyard K98 I got from rsov (£60) came with no bolt ![]()
also anyone contemplating putting a gas dboys K98 bolt in the springer version as a quick upgrade, dont bother, it wont fit 

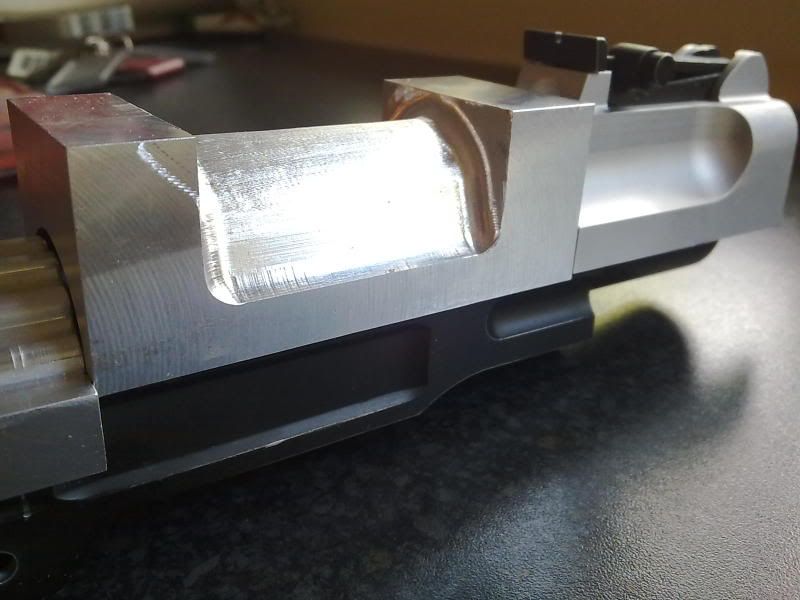
Out of interest, did you use a stencil to put the marking on the receiver of your last Bar98k or was it freehand?
Done with metal stamps. I stamped the markings whilst it was a flat sheet and then bent it into a curve. Then glued it to the receiver with epoxy and the used epoxy putty to build up the front end.
“I wanted to come to the Volga at a specific location at a specific city. By chance it carries the name of Stalin himself. So don’t think I marched there for this reason – it could carry another name – but because there is a very important goal... this goal I wanted to take – and you know – we are very modest, we have it already."
Adolf Hitler, November 1942
"Comrades, Red Army men, commanders and political workers, men and women guerrillas! It is on your perseverance, staunchness, fighting skill and readiness to discharge your duty to the country that the defeat of the German-fascist army and the liberation of the Soviet land from the Hitlerite invaders depend! We can and must clear the Soviet land of Hitlerite vermin."
Joseph Stalin, November 1942


just got these for mine

just started my g43 project, thought i'd put it in here as it will only be a single shot springer. still a long way to go though.


So, you have access to a milling machine again Jay? Looks nice.


When I want your opinion - I'll tell you what it is!
So, you have access to a milling machine again Jay? Looks nice.
yeah pete, needed to start a project so i can look forward to going to work again lol.

Inspired by all on here I have started the project.
DBoys is stripped, nasty Burgundy Chinese stain off!
Question to UK builders. What stain did people use. I am after the Mid Brown darker look rather than the light Blonde look.
This will get me started on the long road
Cheers


Rustins walnut for me!
“I wanted to come to the Volga at a specific location at a specific city. By chance it carries the name of Stalin himself. So don’t think I marched there for this reason – it could carry another name – but because there is a very important goal... this goal I wanted to take – and you know – we are very modest, we have it already."
Adolf Hitler, November 1942
"Comrades, Red Army men, commanders and political workers, men and women guerrillas! It is on your perseverance, staunchness, fighting skill and readiness to discharge your duty to the country that the defeat of the German-fascist army and the liberation of the Soviet land from the Hitlerite invaders depend! We can and must clear the Soviet land of Hitlerite vermin."
Joseph Stalin, November 1942

sgttom that is beutiful work,as for lowering the rear sight,probably would be better but thats the only compromise that i can see that isnt to do with the dboys parts and therfore unavoidable.top marks.in general though ive allways found that the rear sight on airsoft guns needs to have a lower setting to allow for the flat trajecory of bb's due to hop,in real guns the rear sight allows for a constantly falling bullet.the rear sight on my bren is hard to use because my head has to be so low,the other way around it is to raise the front sight whitch would also work and i guess you've done to make the sights work.i love the fact that you can put it beside an original,it really shows the attention to detail that's gone into it,i only hope that the customer is paying you enough
armoury
m1a1 Thompson,sten mk2,mp40,stg44,sterling,mk2 bren gun,lee Enfield no4 mk1,Mauser Kar98, Walther ppk,smith and Weston m10 and Mauser m712
Give me a big enough hammer and a place to stand and I could fix the world.
i'll kill a man in a fair fight or if i think he's going to start a fair fight or over a woman or.......
a problem shared is a problem halved ,but an advantage shared is no advantage at all
if a job's not worth doing then its certainly not worth doing well


Beautiful conversion ![]() That's another one I may give a go over the holidays
That's another one I may give a go over the holidays
GUNS: (ww2)
AGM sten mkII
Classic Army Colt 1911A1 GBB pistol
ARES PPSh-41
Deact Mosin M38
some excellent comparison photos as well
have bookmarked the thread page!
on hold at the mo, got a lot on at the mo including other projects (stops me getting bored ![]() ) just need to find a bit of time to start again
) just need to find a bit of time to start again
I am still working on a complete guide on how to convert a BAR-10 to a K98.
![]() I think we all are! which can only be a good thing
I think we all are! which can only be a good thing
looking good will carry on with mine when my US jumpboots are finished, or might just get a WE luger P08 weathering guide up next ![]()
Hi there need some help please. I have been following the thread used many tips and to date it is all going fine. Just cut the bolt down attached it to the piston (Following Sgttom`s guide) all went together fine but realise I cannot cock the gun. It would appear that there is a small `sear` type thing (pic1) which stops the bolt leaver from pulling the piston back as it does not drop down. Do I need to pack out the Bolt leaver more to make this push down when the bolt is lifted?? When you turn the original bolt it pushes this sear down and allows it to be pulled backwards
Any help appreciated
Just a couple of pics as to my progress. Thanks one and all for this thread it it turns out half as good as the ones featured i will be well pleased
Hi there need some help please. I have been following the thread used many tips and to date it is all going fine. Just cut the bolt down attached it to the piston (Following Sgttom`s guide) all went together fine but realise I cannot cock the gun. It would appear that there is a small `sear` type thing (pic1) which stops the bolt leaver from pulling the piston back as it does not drop down. Do I need to pack out the Bolt leaver more to make this push down when the bolt is lifted?? When you turn the original bolt it pushes this sear down and allows it to be pulled backwards
Any help appreciated
I had the opposite problem with mine. I could rack the bolt but could not pull the trigger. This sear prevents the trigger from being pulled when pushed down (ie while racking the bolt). When you rotate the bolt, it pushes this down. When you put the bolt back into the starting position, it springs up and enables you to pull the trigger. I had to make a cut in the sleeve of the Dboys bolt handle to make space for the sear to elevate. But, if you're careful and have good trigger discipline, you can actually just remove this sear. I've tried removing it and it works normally. Just make sure not to pull the trigger when you don't need to.
looking good there mate! Making faster progress than me at any rate! Though I do hope you haven't attached the rear sight yet- it appears to be on backwards?
Yeah everyone says take your time but it is just too enthrawling i need to have an hour a day on it. Been at it just over a week now so coming along at a good rate. The rear site is just balanced on for the photo need to take a little more off it to make it sit lower down 
Looking good Gordon, much better than my one turned out!
try a selection of small rubber gromets ( O rings ) on the inner barrel?
